Monday, November 20, 2017

Not Your Grandma's Meatloaf!

I've never been a fan of traditional meatloaf. I like it in theory, but it's always been a bland let-down to me. Also, I don't like the ketchup and/or BBQ sauce that most meatloaf is slathered in. Just doesn't work for me. This recipe works because the sweetness of ketchup is replaced by tomato sauce.


Although I call this "spicy" meatloaf, to me, it's really not that spicy. Just full of great flavors. I call it spicy though because I know others have a bigger sensitivity to strong flavors. This one gets the most of its "spicy" from hot Italian turkey sausage. There is one jalapeno in it, but as long as you take the seeds and veins out of it, you shouldn't find it hot at all. All of the spices along with veggies that are left with a little bit of crunch make this a great comfort food!

Not Your Grandma's Meatloaf

Prep time: 25 minutes
Cooking time: 1 hr 15 minutes
Preheat oven to 350 degrees

Ingredients:

  • 2 tbsp olive oil
  • 1 jalapeno pepper, seeded and chopped
  • 1 onion, chopped
  • 1 large celery stalk, chopped
  • 2 cloves garlic, minced
  • 3/4 tsp kosher salt
  • 1/2 tsp ground cumin
  • 1/4 tsp ground nutmeg
  • 2 eggs
  • 1/2 cup milk
  • 1/2 cup tomato sauce
  • 1 cup dry Italian bread crumbs
  • 1 lb ground beef or turkey
  • 1 lb hot Italian turkey sausage
Directions:

In a medium skillet over medium-high heat, heat oil. Saute onion, celery, garlic, and jalapeno in the hot pan and cook until vegetables are tender, but not browned or mushy, about 5 minutes. Remove from heat and stir in the salt, cumin, and nutmeg, mixing well.

In a large bowl, whisk the eggs, then blend in the milk, tomato sauce, and breadcrumbs. Add the two meats and cooked vegetables and stir or work with hands until well combined.

Pat into 8" round casserole pan. Bake 1 hour and 15 minutes or until an instant-read thermometer inserted in the middle registers 150 degrees. Remove from oven and carefully pour off fat. Let stand 10 minutes before serving. 


Served with Syracuse salt potatoes and garlic green beans


Sunday, November 19, 2017

Texas Trash (Spicy Chex Mix)


There are a few things that I only make once a year. One is homemade coconut, chocolate chip ice cream, I only make it in July for my husband's birthday. Another is Texas Trash snack mix which I only make for Thanksgiving/Christmas. I make a double or triple batch and freeze the extra so it lasts through the holiday season.

As you can probably tell by now, my family and I like spicy foods. Our savory snack choices are usually no different. This recipe for Texas Trash can be found all over the internet. I've made a few tweaks to mine, because we like the spice. It's not hot, but it definitely has zip. I've also changed a few of the ingredients to make it "mine". Hope you enjoy!

Texas Trash

Preheat oven to 250 degrees
Prep time: 15 minutes
Cooking time: 1 hour

Ingredients:

  • 1/2 cup butter, melted in a cup with a spout
  • 1/4 tsp celery salt
  • 1/4 tsp garlic powder
  • 1 1/4 tsp seasoning salt
  • 1/4 tsp cayenne pepper (rounded so it's a bit more than 1/4 tsp)
  • 1 Tbsp Worcestershire sauce
  • 1 Tbsp Tabasco sauce
  • 2 cups Cheerios
  • 2 cups Rice Chex
  • 2 cups Corn Chex
  • 2 cups pretzel sticks
  • 1 cup mixed nuts
  • 1 cup goldfish crackers (I use the colored ones but just because I like color)
Directions:

Mix the celery salt, garlic powder, seasoning salt, cayenne, Worcestershire, and Tabasco into the melted butter, set aside.

Mix all the dry ingredients in a large baking dish. Stir butter mixture before pouring over the dry mixture. Stir well until all pieces are coated.

Bake in oven for 1 hour, stirring every 15 minutes.

Cool completely before storing in an airtight container.

Saturday, November 18, 2017

Spicy Chili

The youngest is coming over for dinner tonight. She's in her freshman year in college, but campus is 20 minutes away so we get to see her frequently. Tonight she requested chili for dinner.

Normally, I make my spicy chili on the Traeger for a rich smokey taste. (I'll be sure and share that recipe when I do.) But today, I don't have the time necessary to smoke my meat, veggies, and garlic. Fortunately, what I do have is some left-over brisket in the freezer that I previously smoked. Since it's only 1/2 a pound, I'm going to supplement it with 1/2 a pound of hamburger. The previously smoked meat combined with smoked paprika help give this chili extra rich flavor without the time required on a smoker.

Whether I cook my chili on the stove or on the smoker, my cast iron dutch oven is what I cook it in.

Spicy Chili

Prep time: 20 minutes
Cook time: 35 minutes
Serves 4-6

Ingredients:
  • 1 Tbsp olive or avocado oil
  • 1 lb hamburger, or cube steak chopped into bite-size pieces, or left-over smoked brisket
  • 1 lg onion, chopped
  • 1 bell pepper, diced
  • 2 lg jalapenos, finely chopped
  • 3-4 cloves garlic, minced
  • 1 14.5 oz can kidney beans, rinsed and drained
  • 1 14.5 oz can pinto beans, rinsed and drained
  • 2 14.5 oz cans diced tomatoes
  • 1 8 oz  can tomato sauce
  • 1 Tbsp chopped chipotle in adobo*
  • 3 Tbsp chili powder
  • 2 tsp smoked paprika
  • 2 tsp salt
  • 1 1/2 tsp cumin
  • 1 tsp fresh ground pepper
  • 1/2 tsp cayenne pepper
  • Optional: grated cheddar cheese for topping
Directions:

Drizzle oil in a large cast iron dutch oven. Over medium high heat, fry burger or steak stirring to break up and cook evenly for about 5 minutes. Add onion, both peppers, and garlic and continue to cook until veggies are tender, about another 5 minutes. 

Reduce heat to low and add remaining ingredients, stirring well to incorporate all the spices. Cover and simmer for 35 minutes stirring occasionally. 

For my Hawaii raised husband, his is served over sticky rice. This mainland girl likes hers traditional with a bit of cheddar cheese on top.


*A note about the chipotle in adobo. I used to get frustrated opening those little cans, only to use one little pepper and some sauce for a recipe. Then, I learned how well it freezes so now I keep the remainder in little freezer containers like these and no more waste! I just take the container out a bit before I need it so it thaws a little and break off as much as I need for that recipe.


Wednesday, November 15, 2017

Brenda's Easy Chicken Noodle Soup

My husband came home sick today, so what's a wife to do but make him chicken noodle soup?!?! I really do cook more than chicken and I'm excited to share those recipes as well, but for some reason this just happens to be "chicken week". And, as a bonus, since this is my "easy chicken noodle soup", it takes advantage of my frozen deli chicken from Costco as well as the frozen chicken broth I just made.

One of the best ingredients to good chicken noodle soup is a good noodle. My mom has always made homemade egg noodles, but man that's a lot of work! Fortunately, I found a great dry substitute that is 98% as good as my mom's homemade. I use Country Pasta's Homemade Style Egg Pasta. I get mine at Costco, but I've also seen it at some grocery stores (Winco) and it's available on Amazon by clicking on the picture below.

Brenda's Easy Chicken Noodle Soup
Prep time: 10 minutes
Cook time: 35 minutes
Serves 4 with leftovers

Ingredients:

  • 1 lb of cooked deli chicken, chopped
  • 4 c. chicken broth
  • 4 c. water
  • 2 tsp low sodium chicken bouillon
  • 3 celery stalks, split lengthwise and chopped
  • 1 c. chopped onion
  • 1 c. chopped carrots
  • 1 tsp sage
  • 1/2 tsp poultry seasoning
  • 1/2 tsp dried rosemary finely crushed
  • 1/2 tsp thyme
  • 10 oz. (about 4 large cups) Country Pasta - Homemade Style Egg Pasta
  • salt & pepper to taste
Directions:

Combine all ingredients, except noodles in a large stock pot and bring to a boil.  Add noodles. Cover and reduce heat to low. Boil on low for 35 minutes, or until noodles are tender, stirring occasionally. 

This makes a lot so as empty-nesters, I often make a whole batch and freeze leftovers. But since I've a sicky in the house right now, I'm sure the left-overs will be put to good use. 

Enjoy!

Tuesday, November 14, 2017

Chicken Alfredo Fettuccine with Roasted Broccoli


Apparently the weather has been influencing my menu planning this week as it's been chock full of comfort food. Pasta is always a comfort food to me and this recipe is no exception. What I like about this recipe is that while it does have a few different steps, it doesn't take too long and it can be a great one pot meal if you don't use long noodles like I did with the fettuccine. In full disclosure, this recipe was adapted from one I found at https://iowagirleats.com. I've made a few tweaks that I think make it unique and give it some distinctive flavors that you wouldn't get from traditional fettuccine.

Additionally, you can adapt this to make it lower fat, lower calorie, etc. just by how much fat is in the yogurt/sour cream and milk you use as well as making it gluten free by using your favorite pasta. It's very flexible and forgiving!

Chicken Alfredo Fettuccine with Roasted Broccoli
Preheat oven to 450 degrees
Prep time: 10 minutes
Cook time: 30 minutes

Ingredients:
  • 2 large boneless, skinless chicken breasts, grilled and cut into bite size pieces (or cook however you want)
  • 3 c. roasted broccoli florets (see recipe here: )
  • 8 oz fettuccine (or whatever pasta you want)
  • 2 Tbsp butter
  • 2 - 3 large garlic cloves, minced
  • 2 Tbsp flour
  • 1 c. chicken broth (see my recipe here)
  • 1/4 c. milk
  • 1/4 c. Greek yogurt or sour cream
  • 1 c. freshly grated Parmesan cheese
  • 1/4 tsp fresh ground pepper
  • 1 pinch to 1/8 tsp nutmeg
Directions:

Prepare roasted broccoli per recipe here and set aside.

In a pot of boiling, salted water, cook the pasta according to package directions. Drain, toss with olive oil and set aside.

In a medium saucepan, heat the butter over medium-low heat. Add garlic and cook, stirring frequently, until the garlic is golden, 1-2 minutes.

Whisk in the flour until smooth. Gradually whisk in the chicken broth, Greek yogurt, milk, pepper, and nutmeg. Bring to a low simmer, stirring constantly. Lower the heat and simmer, stirring gently until the mixture thickens. Stir in Parmesan cheese and continue to stir until melted and smooth.

Add the cooked chicken and broccoli to sauce and mix, followed by the cooked pasta if short pasta. If long pasta, like fettuccine, serve sauce on top of pasta. Serve topped with more Parmesan, if desired.


Roasted Broccoli

This is a recipe that can be made as a side dish, or included in my Chicken Alfredo Fettuccine recipe. For the side dish, you just mix it up by adding cheese and or garlic and or both!


Roasted Broccoli
Preheat oven to 450 degrees

Ingredients:

  • 2-3 c. broccoli florets
  • olive oil
  • Optional Parmesan cheese
  • Optional garlic powder or minced garlic
Directions:

Drizzle olive oil over  9x13 baking sheet. Spread around.

Spread broccoli florets over pan, drizzle with more olive oil. 

If serving as a side dish, sprinkle with garlic and cheese.

Bake in oven 10-15 minutes, or until florets have browned tips.

Instant Pot Chicken Broth

OK, so I got an Instant Potelectric pressure cooker a year ago. Yes, it was a bandwagon purchase. I stumbled upon a Facebook users page and the more I read, the more I wanted one and I'm so glad I did! Besides the weekly gallon of yogurt I make us, I also make homemade bone broth. It's an amazing way to use the carcasses of the roasted chickens I get at Costco. And I get to control the ingredients, flavors, and the portion sizes.

I don't know about you, but I previously purchased broths in the grocery store, in one of those Tetrapac containers that hold 4 cups. Rachel Ray has her own brand and there are various others. The problem I've had is that most recipes never use all 4 cups. And by food safety standards, once you open those babies, you better use it up in less than 3 weeks. Well now, with my Instant Pot, and these handy silicone traysI can make my own healthy broth and freeze in exactly 1/2 cup portions. No more wasted broth down the drain!

The great thing about the Instant Pot is that chicken bone broth that previously took me 12-24 hours hours in the Crock Pot, now takes me less than 4 hours from start to finish.

Instant Pot Chicken Broth
Prep time - 15 minutes
Cooking time - 4 hrs

Ingredients:
  • Carcass of 1 roasted chicken (I have an 8 qt Instant Pot so I use 2 carcasses)
  • 3 whole carrots, peeled and chopped into 2" pieces or one cup of baby carrots
  • 3 celery stalks, washed and chopped into 2" pieces
  • 1/2 Onion, cut into quarters
  • 6 cloves of garlic peeled and slightly crushed
  • 1-2 Tbsp apple cider vinegar
  • 1 1/2 tsp salt
  • 1 tsp thyme
  • 1 tsp sage
  • 1 tsp crushed rosemary
  • 1 tsp parsley
  • 10 pepper corns or 1 tsp fresh ground pepper
  • 1 bay leaf
  • cheese cloth and twine to create a bouquet garni for the herbs
Directions:

Place chicken carcass, carrots, celery, onion, garlic, apple cider vinegar and salt into the instant pot. Fill with water up to 2/3 full (this means 2/3 full to the top of the pot, not to the 2/3 of the full line. 

Create a small square with several layers of cheesecloth. Add the herbs to the center of the square. Draw up into a little pouch and tie in around with a piece of twine like this:

Toss pouch of herbs into pot with everything else. 

Press Manual and set to 120 minutes. Let pot natural pressure release. This might take a while as there is so much liquid. It took my 8 qt. 1 1/2 hrs to depressurize.

Final product looks like this. You can see the herb pouch in the center of this picture.


After releasing from pressure, strain the broth through a cheese cloth lined colander and refrigerate strained broth until fat is chilled and can be easily skimmed off. 

Poor into suitable sized freezer containers (as mentioned, I used 1/2 c. silicone trays in link above). Freeze and store in ziplock bags until needed.

Finished product looks like this:


As you can see you can pop them out of the tray and melt in the microwave or add directly to your sauce pan as needed.

Unlike some recipes out there, I do not add chicken feet to my broth recipe. Some people believe that the coagulation factors of adding the chicken feet to the broth adds much desired collagen to the finished product. That may be the case, however, since I mostly use my chicken broth for cooking and not drinking as a dietary supplement, I prefer it to be more broth-like and not thick, like gelatin. But if you like a thicker broth, you can add a few chicken feet in with the rest of the ingredients.

I'll be posting my recipe for Instant Pot Beef Bone broth in the next week or two. It's a little longer process because I roast the bones first but you still get a rich, flavorful broth in way less time than traditional beef broth takes to make. It's also a great base for my homemade Pho.

'Til next time!

Sunday, November 12, 2017

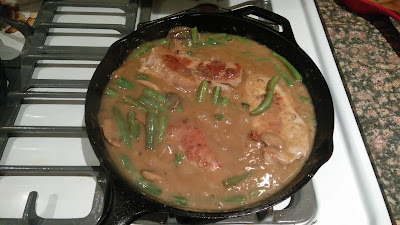
Dijon Pork Chops with Mushroom & Green Bean Gravy


I am a HUGE fan of one pot meals and meals that combine the meat and veggies into one dish. This Dijon pork chop recipe does just that. Dijon can be an overwhelming flavor so I like to use it sparingly. The white wine in this recipe tones down the Dijon just enough so that you taste it but it's not all you taste.

My husband grew up in Hawaii so rice is a staple in our meals. The gravy in this is perfect over white  or brown rice.

The skillets I use are exclusively cast iron. They are versatile and hold heat well and evenly. I've picked up a couple at antique shops over the years, but the ones I've gotten on Amazon from Lodge, like this one are just as sturdy as the old ones I've picked up. Plus Lodge is made in the good old USA!
 
Dijon Pork Chops with Mushroom  & Green Bean Gravy
Prep time = 5-10 minutes
Cook time = 35 minutes
Preheat oven to 200 degrees

Ingredients:

  • 2 Tbsp butter
  • 3-4 boneless pork chops (We are empty-nesters now, so usually I make 3 but leftovers are great)
  • 8 oz sliced mushrooms
  • 1/2 tsp crushed dried rosemary
  • 2 Tbsp Dijon mustard
  • 12 oz cream of mushroom soup (I prefer Pacific Organic brand)
  • 1/2 c. dry white wine (you can substitute chicken broth if you prefer)
  • 1/2 lb green beans, trimmed and cut into bite-size pieces
Directions:

Melt 1 Tbsp. butter in a medium skillet over medium-high heat. Salt and pepper both sides of pork chops and add to hot skillet. Cook 5 minutes each side, remove from skillet onto oven safe plate and place in oven to keep warm.

Add remaining butter to skillet along with mushrooms, rosemary, and 1/4 cup of wine. Saute, scraping pork drippings until mushrooms are tender and liquid is mostly evaporated, about 5 minutes. Add soup, mustard, and remaining wine and bring to a boil. Return pork to pan, cover and simmer for 5 minutes. Add green beans, stir in and continue to simmer covered for 15 more minutes. Salt and pepper to taste.


Creamy White Pepperjack Chicken Enchiladas

I've been wanting to start a food blog for some time. But, I'm lazy. And I rarely write things down. Plus, I just don't like all the pictures that most food bloggers take. Seems time consuming and unnecessary. I mean, if I say "chop onion" you all know what I mean, don't you? I don't have to include a picture of the knife, and the whole onion and the resulting chopped onion do I? That said, this blog will be a work in progress so if I get suggestions from you, I'll listen.

I've been craving some good chicken enchiladas for a few weeks now. The last couple of recipes I've tried ended up bland. I do love me some spicy food, but I also like flavorful food that isn't necessarily hot. You can always kick it up with some hot sauce or pepper. These enchiladas have a lot of flavor because of canned salsa verde, fresh onion and green chilies in the sauce.

I also cut time by using deli chicken from Costco that I buy and freeze ahead of time in one pound portions. I have a FoodSaver V4440 2-in-1 Automatic Vacuum Sealing System with Bonus Built-in Retractable Handheld Sealer & Starter Kit, Black Finish if you're curious. Saving chicken this way is so helpful in that I always have some around for recipes like this or my chicken noodle soup (coming soon!). I find time-savers like these make it easier to have great meals at home without spending all evening in the kitchen.

I hope you enjoy!

Creamy White Pepperjack Chicken Enchiladas
Preheat oven to 350 degrees

Ingredients:

For enchiladas:
  • 8 soft taco sized flour tortillas (I personally use the kind that are 50% corn and 50% flour)
  • 1 lb cooked shredded chicken, chopped
  • 1/2 cup chopped onion
  • 1 c. shredded Monterey  pepper jack cheese & 1. c. shredded cheddar cheese, mixed together (you will use half of this mixture for enchiladas and reserve half for later)
  • 1, 7 oz. can mild salsa verde
For sauce:
  • 3 Tbsp butter
  • 3 Tbsp flour
  • pepper to taste
  • 2 c. chicken broth
  • 1 c. sour cream
  • 1 f oz can diced green chilies
Directions:

Lightly oil a 9"x13" pan and set aside.

Mix chicken, half of each of the cheeses, onion and can of salsa verde in a medium bowl. Roll up equal portions of mixture in each tortilla and place in pan, seam side down.

In a small sauce pan over medium heat, melt the butter then whisk in flour. Add pepper to taste. Slowly add broth and whisk until thick and bubbly. Remove from heat, whisk in sour cream and green chilies until well blended.

Pour sauce evenly over enchiladas and spread remaining cheese mixture evenly over sauce. Place in oven and cook for 25-30 minutes.

These turned out so great that taking a picture was an after-thought. But at least I got one!

These are great right out of the oven or garnished with cilantro (if you like it) or chopped green onions. I left mine as is with guacamole on the side for those that wanted it. Tortilla chips and a green salad finished the meal.

What I liked about this recipe is it is relatively quick and easy if you have the chicken pre-made and shredded. The staples are usually things I have in my pantry and with the exception of the pepper jack cheese, I didn't need to do any special shopping for ingredients.